So, I have been interested in essential oils for a long time. I have used them a bit in the past. I actually use lavender when I wash fleece to kill bacteria or other ickies. We have also used it when we milk. We put it on our goats udders after milking so no bacteria gets in. But, I wanted to use them on us!
I began hearing good things about them from some old friends of ours. They were using Young Living. Then some of our new friends were talking about them. I have been treating our family with herbs for 15 years. People assumed I knew a lot about essential oils and began asking questions. I didn't know much but at this point I wanted to.
The next thing I knew, a good family friend posted about her new oil kit on facebook. So, I sent her a message and she put me in contact with her daughter-in-law, who was a distributor. I purchased a kit and that is one of the best things I have ever done. I am going to paste a facebook message I recently wrote below.
BEST STUFF EVER!!!!! I had a small spot of poison ivy on my arm. I put one drop of peppermint and one drop of frankincense on the area before bed and it is gone this morning. And then my personal big test came this morning. Sometimes I get debilitating headaches that run through my sinus area. I know the cause and I have been using herbal treatments since Dec. Now, I only get two a month. But when they happen, that is it for the day. Nothing helps. Well, today I woke up with one setting in. I read that a drop of peppermint in a glass of water is a good start to your day so I did that and to my surprise it cut the pain in half almost instantly. So, I ran to my computer and looked up how to use it for headaches. I rubbed it around my sinus area with my fingers and the pain is gone! That has NEVER happened before and I have been dealing with these for seven years now. Also, the lavender I posted about yesterday has cleaned up Allison's diaper rash!!!!!!!!!!
I use a lot of natural things in our care but these are really amazing. They are pure and not synthetic and they contain no fillers. It is just a high concentration of all of the good stuff from plants (layman's terms). They work quicker than anything else I have ever seen. My little kiddos were getting over a cold but had a lingering cough. I rubbed Thieves with a little coconut oil on the bottoms of their feet and it is completely gone! Now I get what the big deal is ;)
Wednesday, February 11, 2015
Monday, February 9, 2015
Revamping!
I know it has been a while. Going to pick this back up and post about my fibery stuff along with other things going on. I think I will spend tonight thinking of ways to revamp the blog. Let's see what I come up with ;)
Wednesday, October 29, 2014
Prairie Wind Cowl
As you can see, I have changed the name of my blog and Etsy shop. Yarn of a Tail and 1 Yarn of a Tail (Etsy) is much more inclusive. I didn't think that I would design anything knit. I love knitting I just felt like there was some sort of a block and I wasn't able to design in knit. But something struck and what do you know, two knit items of my own design popped off of my needles!
I have also developed a fondness for wood needles. Funny how your taste can change. I just love them! I used to think they were slow but now I don't. Maybe my knitting has sped up I don't know. I think they work great and I like the bit of hold they have. I also like that they are natural. I started thinking about the fact that I hold these things for extended amounts of time. Some people have reactions to nickel and aluminum is not good for your brain (Alzheimer link). So, I thought I would give wood a try again and it feels and glides perfect! I am planning a trip to the Yarn Barn this weekend for more wood needles! I have even toyed with the thought of making my own from dowel rods. We'll see.
But, as of right now I have a new crochet cowl pattern that I am releasing in the new shop today! Here is a picture of the Prairie Wind Cowl!
I have also developed a fondness for wood needles. Funny how your taste can change. I just love them! I used to think they were slow but now I don't. Maybe my knitting has sped up I don't know. I think they work great and I like the bit of hold they have. I also like that they are natural. I started thinking about the fact that I hold these things for extended amounts of time. Some people have reactions to nickel and aluminum is not good for your brain (Alzheimer link). So, I thought I would give wood a try again and it feels and glides perfect! I am planning a trip to the Yarn Barn this weekend for more wood needles! I have even toyed with the thought of making my own from dowel rods. We'll see.
But, as of right now I have a new crochet cowl pattern that I am releasing in the new shop today! Here is a picture of the Prairie Wind Cowl!
I wanted to make a cowl to help really keep me warm through the cold Kansas winter. This one can hang down a bit too. I didn't want it to be uncomfortably tight but as you can see, it also sits easily around your neck so that it can look cute and do it's job. It is very simple and quick with just single and double crochets. It does use the popcorn stitch which I have provided instructions for (but it is only a bunch of double crochets together, easy peasy).
Monday, October 6, 2014
Autumn Leaves Bracelet
Here is my latest pattern! Perfect for October...Autumn Leaves Bracelet! I love the colors of the changing leaves and I have always loved charm bracelets. So, I came up with this little design. It is very quick to make and only uses a small amount of yarn/thread. One of the best things about this pattern is that you don't have to worry about gauge. I am not a fan of having to get gauge. So, I am working on patterns that are made to your measurements. That way you can use whatever yarn and hook you would like! The bigger the yarn and hook, the bulkier the bracelet. Mine was crocheted with size 20 thread. Blog readers can get a discount in my Etsy shop for 50% off until 11/6/14. Just type in the code AUTUMN6 at checkout!
Wednesday, September 17, 2014
Kid Crochet!
My son turned 4 earlier this month. His 6 year old sister wanted to make him a gift for his birthday. She loves to crochet like mommy so, we went to her book, Way to Crochet, and picked out the perfect little gift. He needed a little wallet for birthday money and those special quarters that 4 year olds love! So, we sat down together while he napped and crocheted a wallet. Since she is new to crocheting, here is what I did to really help teach her actual crochet and not just playing around with the hook and yarn (we do this too at other times). She made the beginning chain and I worked the first row into it since that is usually the toughest row to work. We pulled out my row counter and she would click it at the end of each row. She knew how many stitches to make so she would count as she did her row. I would then do the next row to make sure everything was going smooth and to help the project not seem to daunting for her. We had a great time and I found that method to work perfect. It kept her attention and didn't overwhelm her. In no time we had a cute blue wallet. She went to the button jar and picked out the perfect button. I sewed this in place and then we put the little surprise in a gift bag. When birthday party time came he was tickled with his wallet. And, Clara (6 year old) felt great about the gift she made!
We love the book Way to Crochet. It has 20 super kid friendly projects. They are all quick and easy. It starts with very simple things like chain shoe strings and builds up to (simple) back packs and such. I highly recommend it for teaching your kids crochet.
For the wallet we used Brown Sheep Serendipity Tweed. This is a great durable yarn. It is a wool/ cotton blend. We have made toys with this before too. I will post some photos below!
We love the book Way to Crochet. It has 20 super kid friendly projects. They are all quick and easy. It starts with very simple things like chain shoe strings and builds up to (simple) back packs and such. I highly recommend it for teaching your kids crochet.
For the wallet we used Brown Sheep Serendipity Tweed. This is a great durable yarn. It is a wool/ cotton blend. We have made toys with this before too. I will post some photos below!
Friday, September 5, 2014
Blocking
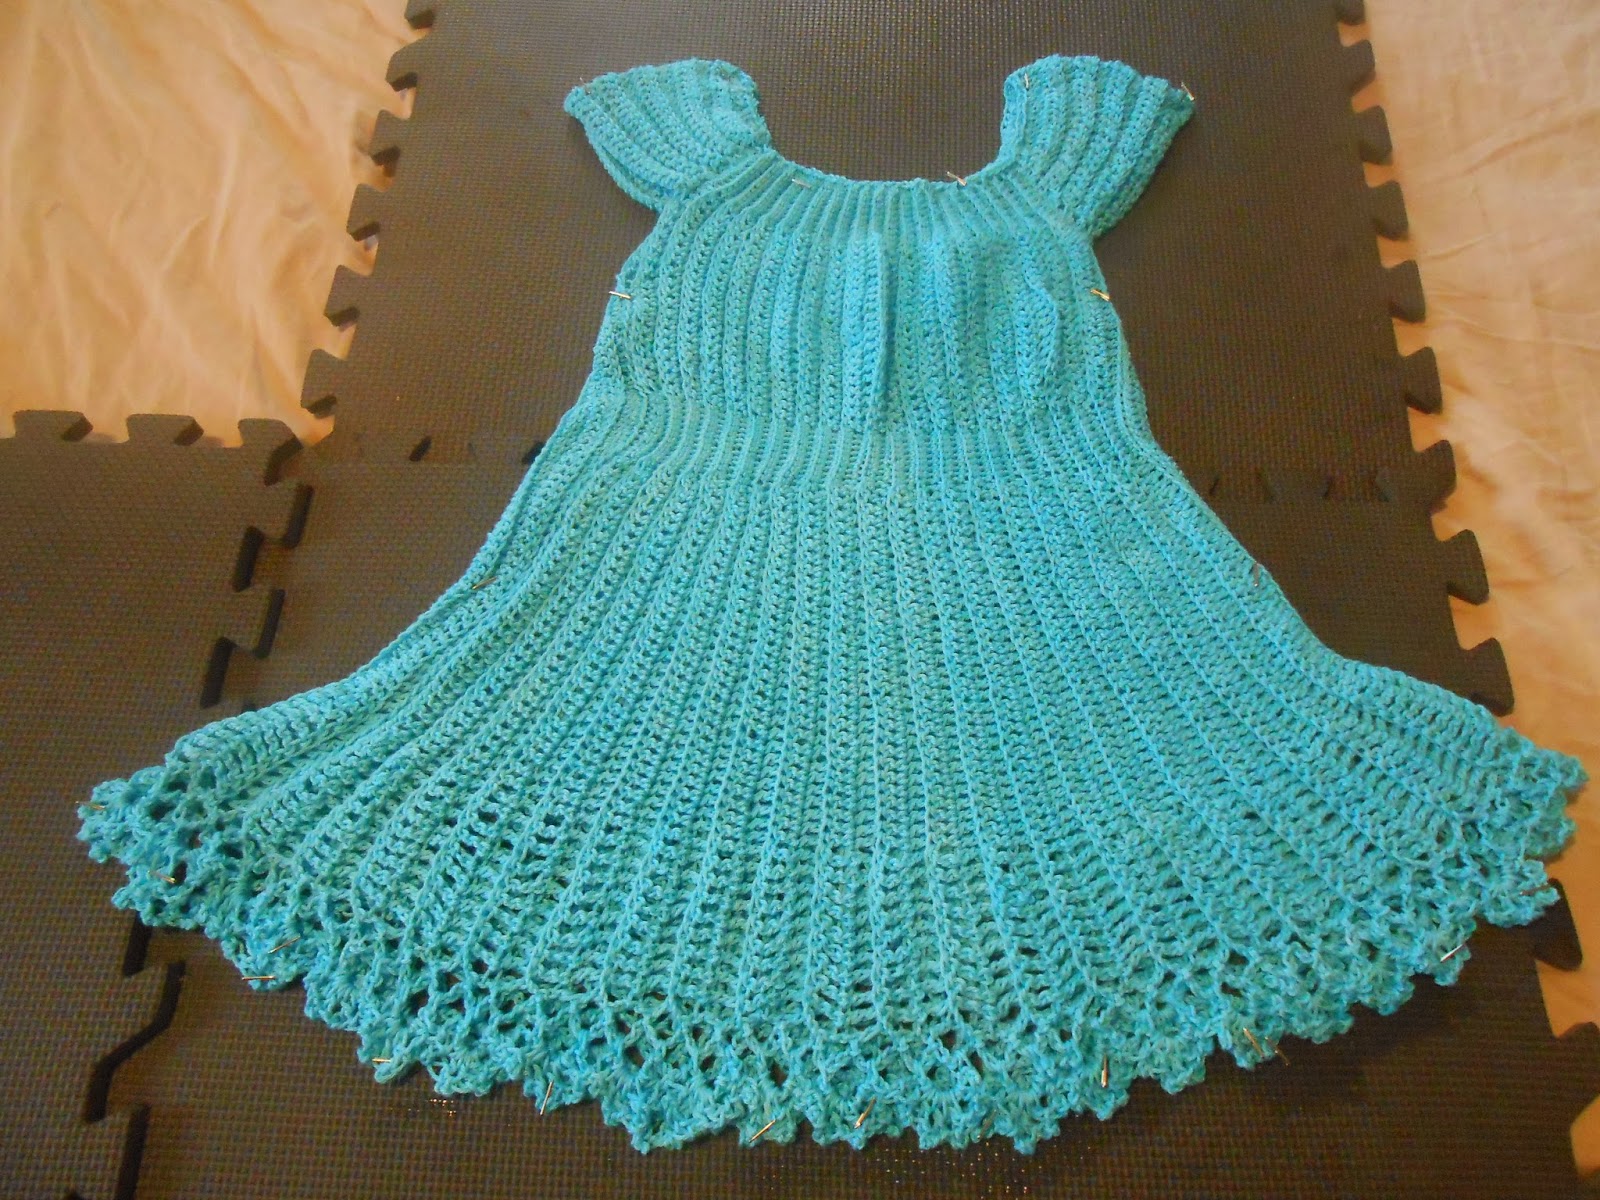
My Cap Sleeve top is finished and currently being blocked! I didn't quite have enough yarn to do the lace on the sleeves. But, it was just one row and not a big deal to leave out. What was most important to me was the lace around the bottom edge. A nice feature on this top is that the neck edge has beading elastic running through a row of single crochets so that you can easily adjust the neck to fit. What a great idea!
If your are new to crochet/knitting, you might be wondering what I mean by blocking. When you finish your project, your stitches sit kind of...wonky. Jasmin on the Knitmore Girls put it well when she said that it looks like a cow chewed on it. The way you tame your stitches and get them to lay beautifully is by blocking them. You take T pins (I ordered mine from knitpicks) and pin your finished object in the desired shape to a foam mat. I use these exercise mats. Then, take your iron and hold it just above (not touching) your object. Move it around steaming the whole thing. The stitches will immediately begin looking better. Let it set pinned to the foam until it dries completely. You will now have perfectly tame stitches!
Another little idea, although I am sure many out there do this already, is to use your leftover bits of yarn to make a blanket. I got this idea from my mom. Thanks mom! I used the bit from this to make my foundation chain. I am going to keep it simple. This blanket will be made up of double crochets in the back loop only. It will be fun to see how it looks with all of the different sized yarns and textures. This way I make use of my scraps and I will have a blanket full of memories of each thing I made with those yarns. Here is my chain ;) It's a start!
If your are new to crochet/knitting, you might be wondering what I mean by blocking. When you finish your project, your stitches sit kind of...wonky. Jasmin on the Knitmore Girls put it well when she said that it looks like a cow chewed on it. The way you tame your stitches and get them to lay beautifully is by blocking them. You take T pins (I ordered mine from knitpicks) and pin your finished object in the desired shape to a foam mat. I use these exercise mats. Then, take your iron and hold it just above (not touching) your object. Move it around steaming the whole thing. The stitches will immediately begin looking better. Let it set pinned to the foam until it dries completely. You will now have perfectly tame stitches!
Another little idea, although I am sure many out there do this already, is to use your leftover bits of yarn to make a blanket. I got this idea from my mom. Thanks mom! I used the bit from this to make my foundation chain. I am going to keep it simple. This blanket will be made up of double crochets in the back loop only. It will be fun to see how it looks with all of the different sized yarns and textures. This way I make use of my scraps and I will have a blanket full of memories of each thing I made with those yarns. Here is my chain ;) It's a start!
Tuesday, September 2, 2014
Golding Pattern!
Introducing Golding the Bouncy Fish! This is a very special little amigurumi because he is filled with a tennis ball! He is very easy to crochet. The pattern uses single and double crochet. The only "more advanced technique" would be the adjustable ring/loop. This technique is not at all tricky and leaves your amigurumi with no holes where your circle begins. Here is a link teaching the adjustable ring/ loop technique. I am offering a special coupon to blog readers for 50% off of Golding's pattern until 9/9/14! Just enter Golding50 at checkout and your pattern will only be $1.50!
Subscribe to:
Posts (Atom)